Amazon Elastic Kubernetes Service (EKS) recently launched in AWS GovCloud (US) enabling public sector customers with FedRAMP, DoD CC SRG, ITAR, etc to run fully-managed Kubernetes clusters.
Amazon EKS in AWS GovCloud (US) has one difference from it’s standard region counterpart deployments. When a cluster is in Private Mode the private IP addresses are not advertised over public DNS. In the standard regions, the private IP addresses of the Kubernetes API server are advertised over public DNS to integrate with on-premises DNS providers. In AWS GovCloud (US), this is disabled for compliance reasons.
Amazon EKS (in reality, Kubernetes) requires DNS hostname and DNS resolution support enabled within the VPC. This means we need to configure DNS in a few different locations in order for this work as expected.
To expose Kubernetes services via external DNS providers, I recommend using External DNS. This will map Load Balancers DNS names to prviate or public DNS names in your desired provider.
Next, Kubernetes uses CoreDNS for DNS resolution within the Kubernetes cluster. If you want your cluster to be able to resolve DNS names from your private DNS provider you can configure CoreDNS to forward queries to the proper servers. By default, EKS is configured to use the local resolv.conf.
But none of the above matters, if you can’t access the Kubernetes API endpoint to deploy services. In this example, I will walk through deploying an EKS Cluster and a Route53 Resolver to handle resolving the DNS endpoint. Before, we get started it is important to understand how EKS in Private Mode and Route53 Resolvers work.
Amazon EKS in Private only mode attaches a Route53 Private Hosted Zone to the VPC so that the VPC can resolve the Kubernetes API endpoint to the private IPs attached to the Control Plane ENIs within your VPC. The Route53 Resolver allows external services to query the Rout53 Resolver as if it was a DNS server so that they can resolve the EKS Cluster API Endpoint via VPC DNS.

Let’s get started by deploying a EKS cluster to AWS GovCloud (US) West using the eksctl. Note: please configure an AWS CLI profile with your GovCloud credentials before getting started, I called mine govcloud.
export AWS_PROFILE=govcloud

# create the cluster
eksctl create cluster --name private-dns --managed
Next, create a K8s-AdminRole that we can attach to a bastion host in a peered VPC to test the configuration. This role will have administrator access to your AWS VPC account for testing purposes.
# create the assume role policy for the ec2 instance role
cat > ./ec2-assume-role-policy.json <<EOF
{
  "Version": "2012-10-17",
  "Statement": {
    "Effect": "Allow",
    "Principal": {"Service": "ec2.amazonaws.com"},
    "Action": "sts:AssumeRole"
  }
}
EOF

# create an admin role
aws iam create-role --role-name EKS-AdminRole --assume-role-policy-document file://ec2-assume-role-policy.json
aws attach-role-policy --role-name EKS-AdminRole --policy-arn arn:aws-us-gov:iam::aws:policy/AdministratorAccess
Now that we have the role, let’s attach it to the EKS cluster so that we can authenticate with the role.
# attach the iam role to the cluster so we can authenticate with the role
eksctl create iamidentitymapping \
  --cluster=private-dns \
  --arn=$(aws iam get-role --role-name AdminRole --query="Role.Arn" --output=text) \
  --group=system:masters \
  --username=iam-admin-role
Now that we have a role, let’s make the cluster private using the eksctl.
# update the eks cluster endpoints
eksctl utils update-cluster-endpoints --name=private-dns --private-access=true --public-access=false --approve
Next, let’s peer our new EKS VPC with another VPC in our account. I created a basic VPC using the AWS Console for testing purposes with Public Subnets only. The EKS_VPC_ID is the VPC created with eksctl and PEER_VPC_ID is the VPC I created with the Console. The commands below will peer the VPCs.
export EKS_VPC_ID="vpc-0e89f97e11ad73440"
export PEER_VPC_ID="vpc-02706be7c34f96350"

# create vpc peering
aws ec2 create-vpc-peering-connection \
  --vpc-id $EKS_VPC_ID \
  --peer-vpc-id $PEER_VPC_ID \
  --query "VpcPeeringConnection.VpcPeeringConnectionId" \
  --output text

# accept the connection using the ID from the previous command
aws ec2 accept-vpc-peering-connection --vpc-peering-connection-id <VPC Peering ID>
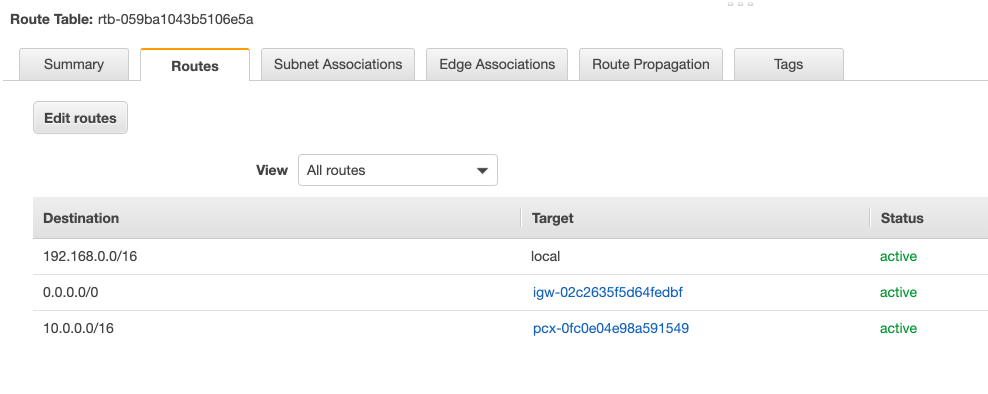
Once they are peered, update all of the route tables so that there are routes from the EKS VPC to the Peer VPC over the peering connection and vice versa. The commands below will list all of the Route Tables associated with your VPCs.
# update route tables each vpc so that traffic can route over the peering connection
# this command will list all of the route tables for the vpcs
aws ec2 describe-route-tables --filters "Name=vpc-id,Values=$EKS_VPC_ID"
aws ec2 describe-route-tables --filters "Name=vpc-id,Values=$PEER_VPC_ID"
The VPCs should now be able to communicate with one another. Now we need to update the EKS Control Plane Security Group so that it can accept traffic from the peered VPC CIDR range. Run the following command to get the Security Group ID of the control plane.
# add 443 from peered vpc to security group
eksctl get cluster --name private-dns

# add the following ingress rule
aws ec2 authorize-security-group-ingress \
    --group-id <group ID from previous command> \
    --protocol tcp \
    --port 443 \
    --cidr <peer vpc cidr range>
Our EKS cluster is now ready to accept traffic from the peer VPC, but the peer VPC still can’t resolve the traffic. To facilitate cross VPC DNS resolution, we need to configure Route53 Resolvers in each VPC. First, let’s create security groups that we will attach to the Route53 resolvers.
# create route53 resolver security groups
aws ec2 create-security-group \
  --group-name "InboundResolverSG" \
  --description "allow communication to the inbound route53 resolver" \
  --vpc-id $EKS_VPC_ID

aws ec2 authorize-security-group-ingress \
    --group-id "<id from previous command>" \
    --protocol udp \
    --port 53 \
    --cidr <peer vpc cidr range>

aws ec2 create-security-group \
  --group-name "OutboundResolverSG" \
  --description "allow communication to the outbound route53 resolver" \
  --vpc-id $PEER_VPC_ID

aws ec2 authorize-security-group-ingress \
     --group-id "<id from previous command>" \
    --protocol udp \
    --port 53 \
    --cidr <peer vpc cidr range>
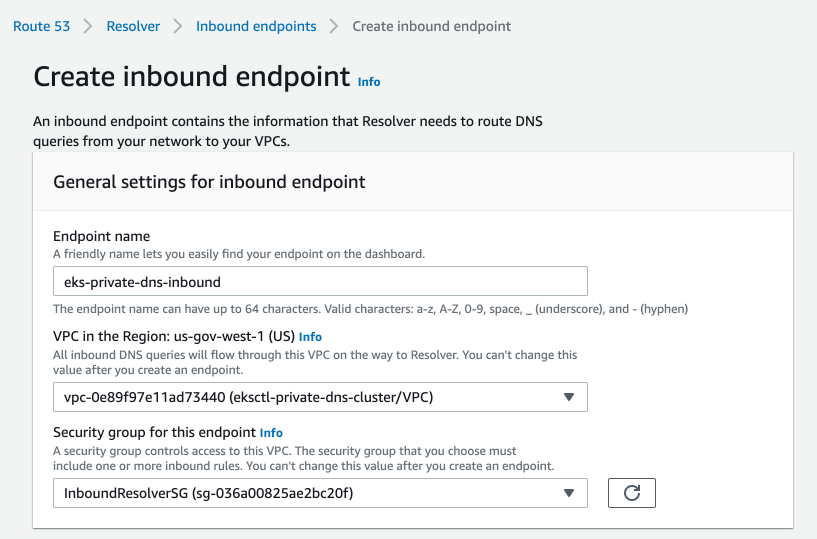
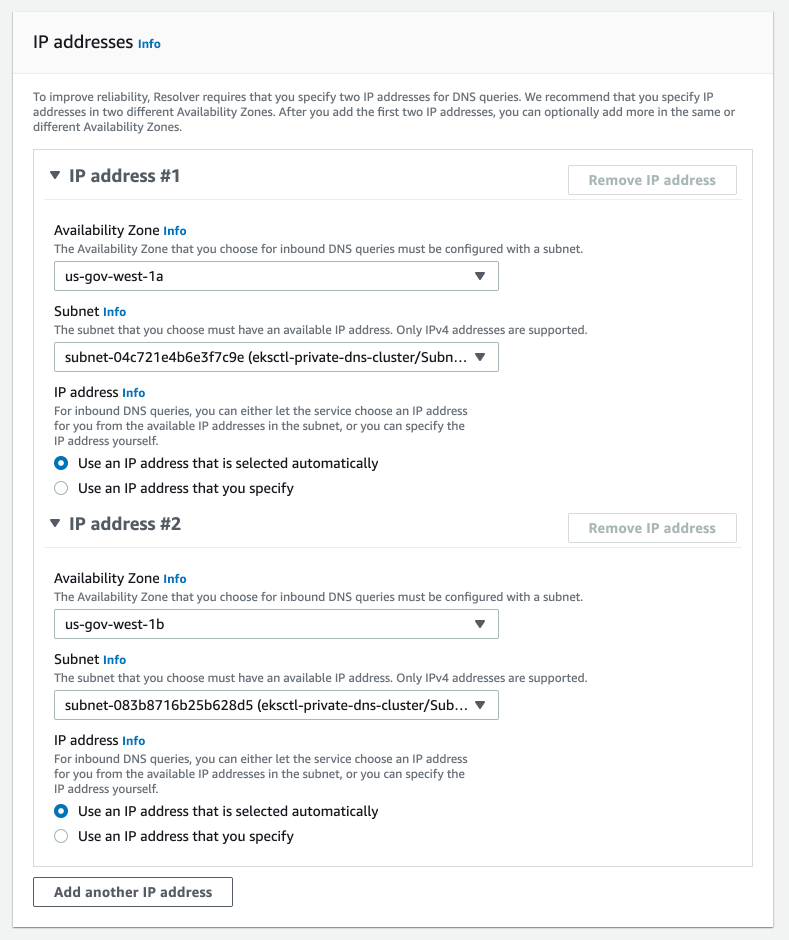
Now let’s create the Route53 Inbound Resolver that will receive DNS queries from clients outside the VPC. For the sake of this guide, I used the Console to create the endpoints. Navigate to Route 53 > Resolver > Inbound. Enter the following settings, replacing with the VPC that your EKS cluster is deployed:
Once you have the Route53 Resolver configured, you can configure it with your on-premises DNS provider such as InfoBlox or another Outbound Route53 resolver. For InfoBlox, configure a Forward Zone that points the DNS record of the EKS cluster to the Route53 resolver IP addresses. To use it from our Peer VPC, we can configure an Route53 Outbound Resolver in our peered VPC. Navigate to Route 53 > Resolver > Outbound and create a new endpoint. This time, use the Peered VPC and the Outbound Security Group IDs we created earlier.
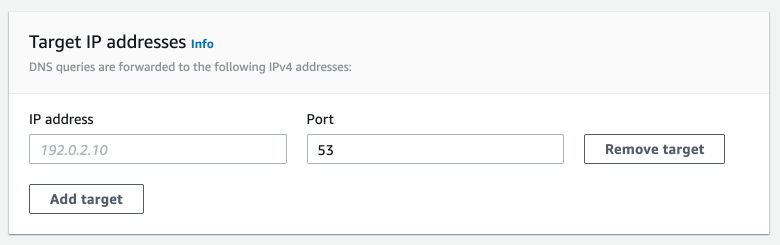
We now have an Inbound Resolver and an Outbound Resolver we need to create a rule in our Peer VPC that forwards traffic from the Peer VPC to the Inbound Resolver in the EKS VPC. Start by creating a new rule and configure the rule using the following settings, replace with the Outbound Resolver that you created and the VPC of the Peer VPC.
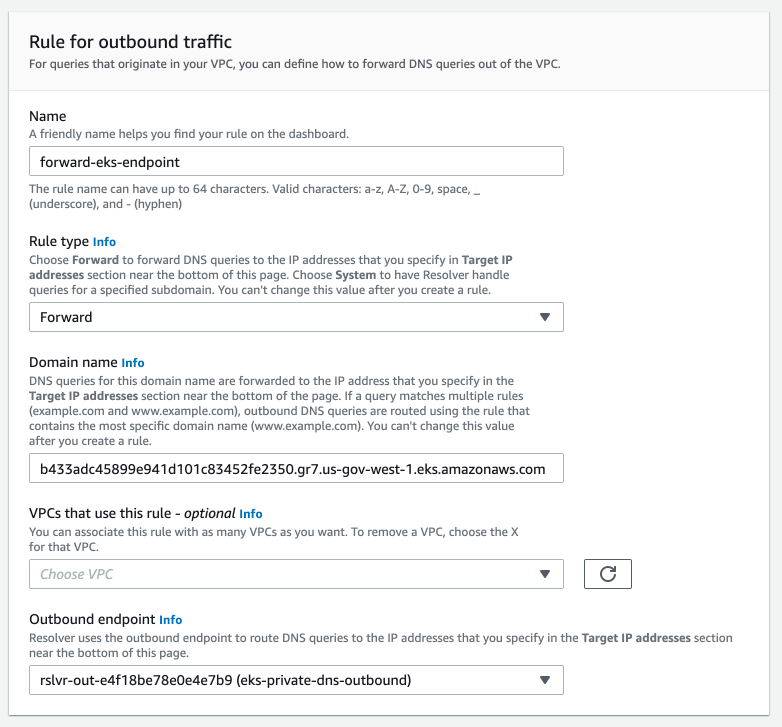
Next, configure the targets as the IP addresses created by the Route53 Inbound Resolver.
Once you click create, you should now be able to resolve the DNS of the EKS cluster in private only mode from the Peer VPC by traveling out the Outbound Resolve, to the Inbound Resolver, to the Route53 Private Hosted Zone created by EKS. To test this configuration, spin up a bastion host in the Peer VPC with the Admin Role we created earlier, SSH into the Host, and setup kubectl and attempt to run commands against the host. You will need run the following command to generate the kubeconfig so that your bastion host can authenticate using the attached role.
aws eks update-kubeconfig --name private-dns
In this post, we covered how to configure resolution via Route53, but as mentioned above this can be configured with on-premises providers such as InfoBlox or BIND. Step for configuring InfoBlox can be found here, Creating a Forward Zone or by configuring BIND using the following configuration:
zone "<EKS Kubernetes API Endpoint>" {
    type forward;
    forwarders { <inbound endpoint IP #1>; <inbound endpoint IP #2>; };
};
If you have any questions, reach out to your AWS Account Team to get in touch with a Specialist or reach out to me on Twitter.